|
Cleaning |
|
Home |
|
Products |
|
Contact |
|
Distributors |
|
Military |
|
Installation |
|
Cleaning |
|
News |
|
Cleaning |
|
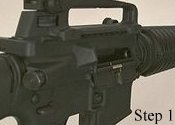
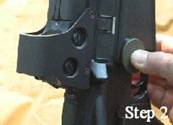
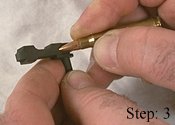
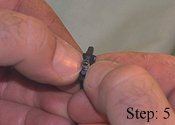
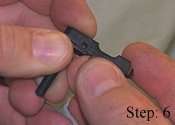
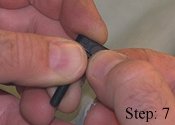
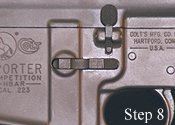
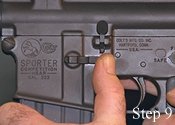
Step 1 : Clear the Weapon - Keeping the muzzle pointed in a safe direction, remove the magazine, pull charging handle to the rear and visually inspect the chamber to make sure that there is no ammunition present. Remove all live rounds from the working area and secure them in a safe place. Step 2 : Remove the Ambi-Catch™ - See "Installation Instructions" for detailed information concerning the removal and installation of the Ambi-Catch™. Step 3 : Remove the Pin - Insert the nose of a ball point pen or nose of a live round (Caution: the use of "live rounds" should be done in "field conditions" only while exercising extreme caution when no other suitable tool is available) into the small hole in the bottom of the lever. When the nose of a ball point pen or live round has been fully inserted into the small hole, the pivot pin will be displaced sufficiently for removal. Fully remove pivot pin and secure. Step 4 : Remove Lever and Spring - The lever and spring can now be removed for cleaning and inspection. Replace the spring if it is worn, weak or damaged. Use a replacement "Extractor Spring" (found in the Bolt Group of the M16A2 and M4 Carbine) to replace worn, weak or damaged springs. Step 5 : Install the Spring - With the large end of the spring facing down and the cut end toward 9 o'clock (nose of base pointing toward the user) place the leading edge of the lower coil into the forward corner of the cup and "snap" the rear end of the lower coil of the spring into place using your thumbnails. Step 6 : Place Lever on Base - Place the rear of the lever over the spring/base assembly and align the holes of the lever with the pivot hole of the base. Step 7 : Install Pivot Pin - Continue to apply slight pressure to the top of the lever at the pivot point (solid boss just forward of the serrations) and guide the pivot pin into the top hole of the lever. Push pivot pin in until it is fully seated. Depress lever several times to check for smooth function. Step 8 : Re-Install the Ambi-Catch™ - See "Installation Instructions" for detailed information concerning the removal and installation of the Ambi-Catch™. Step 9 : Function Test the Ambi-Catch™ - Test the Ambi-Catch™ with all of the magazines that you will use with your weapon. Test both primary and secondary methods of release. The Ambi-Catch™ should operate smoothly with a positive recovery. If recovery seems weak or the lever is extremely easy to depress; replace the spring.
|

|
Home | Products | Contact | Distributors | Military | Installation | Cleaning | News |
|
Copyright © 1999-2018, Norgon, LLC™. All rights reserved. |
|
The Ambi-Catch™ is designed to be easily disassembled for cleaning and maintenance. |
|
The Ambi-Catch™ Tool makes installation or removal of the magazine catch effortless. |

|
TM |